

But for now, let's talk about the other side where most of Bostons toys reside. And a tv. And to be perfectly honest, we have no clue what we want to do with this room. Turn it into a play room, or media room or game room (for adults with a pool table and bar) we have so many ideas and can't decide.
But one thing is for sure we had to tame all of those toys. It was getting out of control. Or O.O.C. as Jer would say.

Woah, I can't believe we've lived like that for 2 years. But focusing on our downstairs first put this room on the back burner.
But alas, 2013 hit. It was a new year and a perfect time to get organized up in there. So that first Saturday of the year we created our game plan, did a little sketch to make sure we were on the same page and headed out to Target to grab some pre-made cubbies. We pondered thoroughly on the idea of building our own cubbies unit but when we found some at Target on sale for $35 we knew that was the cheapest/easiest way to go. We also picked up 4 green 5 dollar bins to fill some of the cubbies with.

Since we were using pre-made cubbies we knew we wanted to "customize" them to give them a little more character and umph. So we stopped by Home Depot to pick up some supplies. Wood, handles, paint and some magnet clasps. Our plan was to add doors on the unit.

The paint we got was this $3 paint from the "Oops" counter in the paint section. I always check that area first for any cheap unwanted paints. And what do you know.....they had a bright white satin paint that was way cheap and more-than-enough-paint sitting right there on the counter. Score.

We got home and started building the cubbie unit. There were pretty easy and took him all of about 45 minutes to put together.


There they are ready to be filled and customized with some doors. So our job was to start organizing the masses. We had a pile for: infant toys, books, throw-away-able and keeping.

The following day Jer cut the wood to make the two doors, drilled holes in them for the handles and I painted and Polyacrylic'd them.


We also decided to build a little base on the bottom of the unit to make them stand up off the carpet so that when the doors opened downward they would open all the way and not get stuck on the bottom frame of the unit. We had leftover 1x3 scraps of wood that Jer cut up and used.

Here's a hinge for one of the doors.

It was important to secure them to wall so that they were fully child safe. Safety comes first. Here's Boston drilling the screws in. So he thinks. :) He feels so cool having a drill set like daddy.


Secured. Daddy tested and daddy approved. This baby ain't going nowhere.

Oh and you see those black and white stripes?! Welp, I used some left over fabric from Boston's Tee Pee pillows to cover the backings to some of the cubbies. It was just another little free way to customize them and add character. I only added fabric to the cubbies that wouldn't have the green bins in them.

Here they are without the doors and all filled up. We were so excited to get those doors up and see the whole shebang but we had to wait until the paint had fully dried.


And here's WITH the doors!!

We think it does the trick and looks pretty good all for a total of about a $100 (including the Home Depot supplies we picked up). All of which we used with gift cards that we got from Christmas. Thanks, mom.


As to how Jer installed the doors....it was quick and easy.

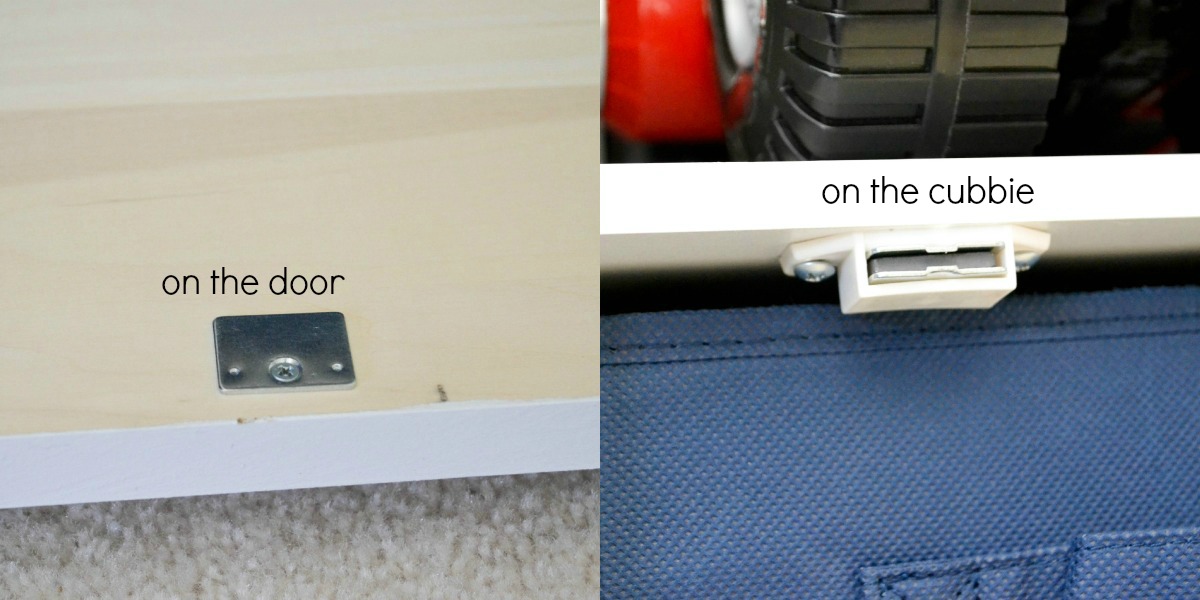
We got a total of 8 magnet clasps (not really sure of the name of them) and 4 hinges. He placed the hinges at the bottom so that the doors would open downward. And in order for gravity to not bring the doors down he placed some magnetic clasps at the top for the doors for them to cling to. We didn't want to have a constant-falling-cubbie-door problem.


It really makes this room feel more clean and organized.
Goal = success.


It wouldn't be complete without his teepee so the ironing board had to take a hike. It found its home in our closet where it used to be. The teepee is a perfect fit in that little corner of the room and it rounds off his "play area."


Now to conquer the other side of the room......
Have you guys ever "customized" some pre-made cubbies? I'd love to hear about them. Are we the only ones that can't figure out how to hide those pesky tv cords? For now the play room will stay like this but we are always thinking of ways to make better use of this room.
20 comments:
That is such a good idea! We have the same cubby in the dark brown color for Carter's closet. love the doors though!!
Love It!
We are in the process of decluttering our home since we are listing it Tuesday to sell. Currently our boys bedrooms are a crazy mess since we are going through their toys and boxing stuff up. We definitely need this in our new home.
We just bought some of the same shelving units! Love the doors you put on them though..never would have thought to do that!
xo
We have the same cubbies--they help so much!! Carter also has the cement mixer remote control car and the B you drum! Two favorites over here : )
And that little drill?? I'm dying. SO cute.
P.S. Love the new look!!
I need to do this.. you guys did an incredible job!
Where is that tent from ?? adorable
SUPER cute---love it!!!
Julie
www.thechirpingmoms.com
Looks amazing. We are starting to get more organized. And I love the Oops counter. Excellent score! And tag tent is soooo adorable! I love love love it
The fabric?? Brilliant!! I'm going to add that to my son's shelf today!! It turned out great.
very nice. love the addition of the doors. and the teepee is too cute.
What a great change!
love cubbies! great for storage and a little color to a room. new follower
What a great storage solution! I love how you customized the cubbies and the tent is adorable. Found you through the networking blog hop! :)
That turned out great! We have those same cubbies in the boys room, I'm wondering if I should do the same with those!
New follower from Thee Blog Hop, I'm loving your blog!
hello from the hop! Your blog is super cute. Newest follower :) Hope you are enjoying co-hosting Kelly's hop, I did it last month and it was great! Feel free to stop over to my blog and say hello! :)
This looks fantastic! We have a similar cubby style system and my boys take turns dumping everything out. I can't wait until they are older and STOP! lol
New follower from the Hop!
http://www.parloandlogi.com/
What a transformation! I love the doors on the bottom, the paper behind the open cubbies is such a cute idea too :) New follower form the hop :)
Lish @ Imprintalish
Awesome post! You guys did a fantastic job!
I'm your newest follower from Monday Mingle :)
Aanika from www.theactivemum.com
It looks great, you guys did a good project here! I laughed at the last line. :)
Looks great! We're doing something like this for our playroom. Can't wait to get more organized - so hard with kids toys!!
That looks like such an awesome family project!
Post a Comment