Showing posts with label house. Show all posts

8.06.2014

Goodwill Lamps Gone Good

A few weeks back I headed over to my beloved Goodwill in search of whatever I could find.  :)  Call me crazy but it's one of my favorite stores, ever.  Everything is cheap and diy-able.  Oh and the best part, each month they have one 50% off days!  Score. 

After perusing through most of the store, I headed over to the lamp section and there were a ton to choose from.  All kinds and styles.  I first spotted one glass lamp that I pretty much loved from the moment I saw it and then at the other end of the shelf I saw another one that was almost identical to it.  I was immediately sold.  I paid my 10 buckaroos and brought those babies home.  When I brought them home, Jer couldn't even notice the difference in them.  Since we are re-doing our master bedroom a bit (like our grid wall that I'll be posting about soon, fingers crossed) I needed to find some lamps of the prettier/classier kind.  And these were it.  
Since the parts were a little rusty and one of them didn't work I went ahead and got some new parts for them both and one lamp kit package for the one that didn't work.  It didn't matter what the "parts/hardware" looked like since I would be spray painting them all the same color.
The question was, what color did I want them painted?  These were my two choices and I loved them both. So, in the end, I chose both!  Why not give them a little two-toned action?  The Krylon was used for all of the "parts."  But the mint color was the real winner since it was chosen to give it some color on the outside.  
These $10 lamp shades from Lowe's were simple, cheap, white and round....everything that I was looking for.
Here's what we started with BEFORE:
The lamps did us good for over 8 years but it was time for them to go.  But no worries, they'll be getting a makeover themselves.
And here's one new beauty (on my side of the bed):
I LOVE how they turned out.  Especially that mint color.  They look like they cost a pretty penny.  But really, they cost a total of $60 for both!
You can see the satin nickel color we used for the hardware of the lamps.  It's pretty perfect if you ask me.  :)

So, what do you think?  Don't these lamps look better?  And doesn't that mint add the perfect touch of color?  

xo
Jen

2.15.2013

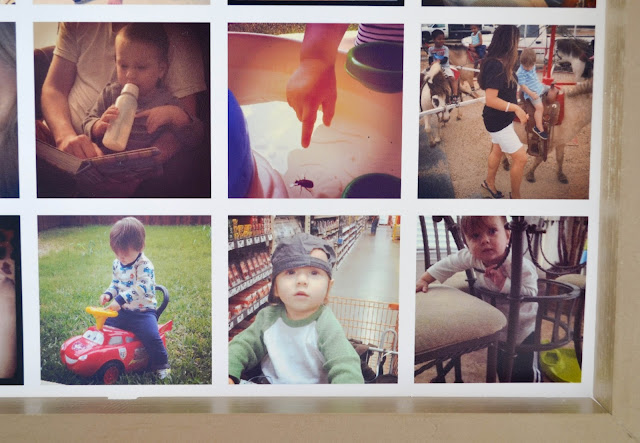
Framing 96 Instagram Photos

Late last year I started looking for a way to "memorialize" our instagram photos in a way that would be displayed on our walls rather than in the form of a coffee table book (eventually we'll have them all put into a book).  And what better way than to frame them?

96 of them.

When I saw that Printstagram could turn them into posters I was sold.  I loved the idea of fitting lots of pictures into one poster.  So I ordered 3 huge posters ($25 each) all with 96 photos.  A little overboard, maybe.  But they'll be fun to look at anytime we feel the urge to reminisce.  :)

Fast forward to the day these popped up on my front door.
I immediately opened one to look at all the pictures and to make sure I liked the quality.  Luuurve!!!!  The poster was thick and the pictures turned out awesome.  As awesome as iPhone pictures can get.

I was pretty sure that I wouldn't be able to find a ready made frame to fit this poster so Jer and I set out to custom make one ourselves.  All we needed was a couple of 1x2's, a staple gun and some paint.

We Jer made our measurements and built it.

He used 3-5 staples on the back side of each corner to hold it together.  

Once it was all put together, I spray primed and painted it using some leftover paint from our living room project.

After letting the paint dry, we stapled the poster to the backside of the frame.
We love saw tooth hangers.  You can use them on any custom wall art.  Jer nailed one to the back (top middle) of the frame to hang it with.  
But before we show you the final product.....let's take a look at some of my favorite instagram photos on this poster.  

Hands down my ultimate favorite is when we got to visit Facebook headquarters during our San Francisco trip when Boston was 9 months old.    
Another favorite....the picture of Boston in his AC/DC shirt while shopping at Target with me.  He looks like a doll face here.  And the picture right under runs a close second.  That cheesy smile makes my heart burst.  
Boston in his bouncer with his hands crossed is his "trademark."  Till this day he sits like that and even walks with his hands crossed behind his back.  It's quite adorable.
Oh and this cowboy hat picture.  Love.
Why is it that I love shopping cart pictures?  His hat turned backwards kills me.  Two words: stud man.
When ordering these posters I wasn't exactly sure where I wanted to put them and if I wanted them split up in different areas of our house or all three frames and hung side by side on a wall.  After talking it over with Jer, we decided that putting it in our downstairs half bathroom would be a perfect spot (doesn't everyone put 96 pictures of themselves in their bathrooms?).  

We had a canvas wall painting above the toilet that we've had since we've lived here and it needed to be updated (there's a few other things I'll be switching up in this bathroom later).  

Here you have it.  A huge oversized-instagram-poster sitting over the toilet.  Looking right back at you while using the pot.
Here's the before with the canvas painting.  Totally 1990's.
Much better.  Now we get to walk into this room and reminisce over our pictures from over a year ago. And when/if I ever want to change it out it won't be that hard.  Remove the staples and replace.  
Am I the only one that has framed Instagram pictures?  Or have y'all done some insta-framing too?  I haven't decided what I want to do with the other two posters or 192 instagram pictures.  More than likely it'll consist of some custom framing but that's undecided for now.  One thing that is decided....we will be sharing it with you all first.  

1.30.2013

His Closet Says Roar

These days animals are tha thang for Mr. B.  He probably knows roughly 30-40 animals and species.  He studies his animal books like he's studying for a pop quiz.  I took that as a clue to get something animal-ish into his room somehow.  I've seen all over the web/pinterest where people are using toy animals for wall decor and even turning them into book ends.  

His closet needed some organization.  It's got two shelves and two hanging rods and that's it.  It's not enough for all of his ties, shoes and hats.  

This is where our animals come in.  Making an animal-hook-board would be perfect for hanging all of his ties and hats which would leave more room on the shelf for his shoes.

This would be a pretty simple project since we had most of the material and it didn't require hardly any big tools (Jer's saw).  Only supplies needed were: board, toys, stain (or paint), drill, exacto knife (or something to cut the animals in half) and screws (for the animals and board).  Our board we used was a 36 inch pine board.  And our animals I got a few months back from hobby lobby.  

First things first....cut the animals in half.  

To my surprise they were solid.  Originally I was going to use gorilla glue and glue them to the board if they were hollow but since they were solid Jer said we ought to drill a hole in them and then drill a screw through them.  This way they would be sturdy.  As in, they could almost hold my weight.  #notevenclose
After the board was stained and dried I laid the animals out to place them.  I did a lot of rearranging and strategizing to the get most out of this board.  
I marked the spots and Jer drilled the holes for the screws.
Mr. Perfectionist decided that he didn't want the screw head sticking out on the back (he wanted the board to be flush against the wall) so he used a certain drill bit to make a hole bigger on the backside for the screw head to fit in.  
We started noticing a certain smell coming from a certain toddler.  Diaper changing break.
Now that everyone was clean Jer then drilled his holes into the animals.
As he was drilling the animals....wait, that sounded ummm not so good.  As he was making his holes Boston was having fun putting the screws into the board.  It was like a cool and manly puzzle to him.  So instead of taking the risk of something getting messed up Jer got a scrap piece of board and drilled holes in it for Boston to play with.  He was content for a good 30 minutes with that thing.
He would put the screws in and then turn the board over and dump them out.  
And we have a giraffe.  One down eleven to go.
Since the toddler was at bay we proceeded to get the rest of the animals screwed onto the board.
The hidden screws.
Moved spots and stiiilll working on his board.  He even went and found him some longer screws.  Totally not child friendly but he loved it.
Then he went upstairs and got his drill and started drilling holes into the animals behinds like daddy.  He watches everything his daddy does.  Why do all these sentences sound weird to me?  I have a 13 year old mind, I guess.  :)
Here's B's closet.  Bare and unorganized.
Here she is all screwed in.  We're gonna call this the animal wall.  Roar.

Much better.  His shelf is now dedicated to only his shoes.  
Ties on the left side, belt in the middle and hats on the right.
He had 3 hats and 3 ties I didn't have room to hang so we'll be adding a second board for those and anymore that he gets.  

Next up is more shelving.  There's plenty of room for lots of shelving but it's the design we always get stuck on.  Until then, we'll enjoy the newly added space for his shoes and organization for his accessories.
Related Posts Plugin for WordPress, Blogger...